
How to install Astro? -A Step By Step Installation Guide for Beginners
Astro CLI, which offers features like static site generation and a faster build process, is a potent tool for contemporary web development. We'll go over how to install Astro CLI on your machine in this post.
Prerequisites
Make sure your system has the following prerequisites installed before you start:
- Node.js: This is a prerequisite for Astro CLI. From nodejs.org, you may download and install it.
- NPM (Node Package Manager): Node.js already comes with npm (Node Package Manager), thus no additional installation is required.
How to get started?
To install Astro CLI on your computer worldwide, do the following command using npm or yarn:
npm install -g astro
yarn global add astro
You can use the Astro command from any directory after using this command to install the Astro CLI package globally.
You may confirm that Astro CLI is installed by looking up its version once the installation is finished. Enter the following command and run it:
astro --version
The version number ought to appear if the installation was successful.
You can use Astro CLI to manage your contemporary web development workflows and start new projects now that it's installed.
Use the following command to start a new Astro project:
npm create astro@latest
Folder Structure
The folder structure that you can see here is created to provide a clear structure for the development of modern and high-performance web applications. The Astro.js framework, which is used to build static as well as dynamic websites, uses this structure to support a modular and streamlined development process.
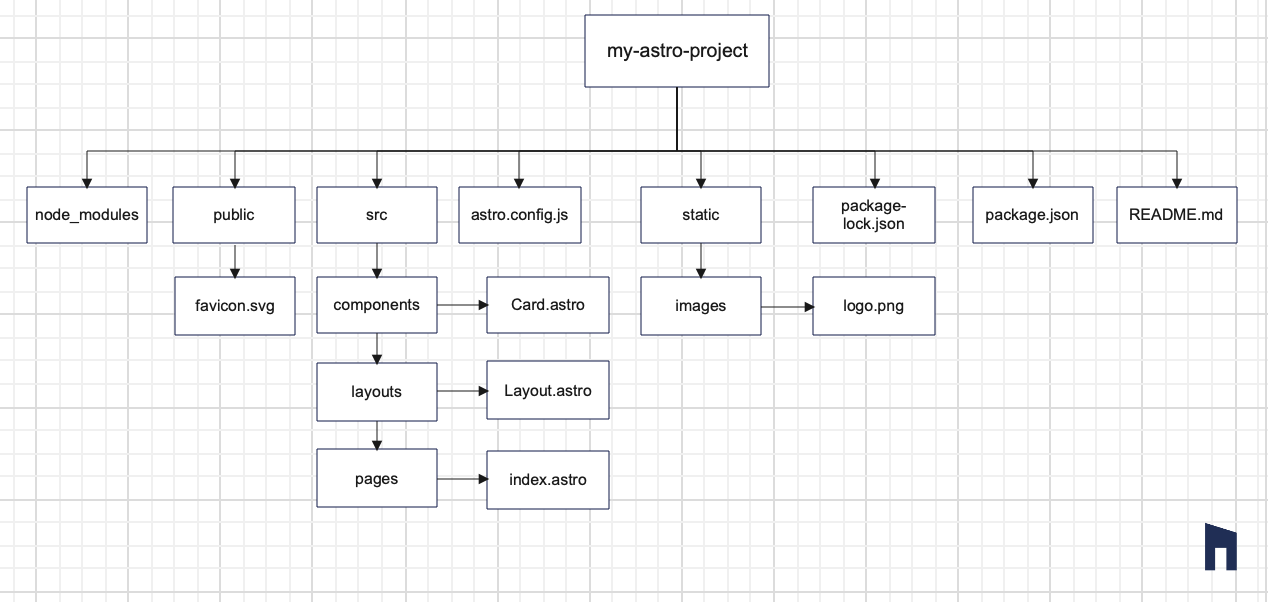
node_modules: This directory is created automatically and contains your project's dependencies. Node modules are maintained by npm, making sure your application has all the packages and libraries it needs.
public: The public directory is reserved for files that are available to the public. Most commonly, it contains assets such as images, fonts, static files, etc. For example, in your example, you have a favicon.vg file that serves as your web application's favicon.
src: The most important part of your project is the ‘src’ directory. This is where you’ll find the sub-directories for various parts of your application.
- components: This is where the reusable parts are kept. For example, the ‘Card.astro’ component could be used in different parts of your application.
- layouts: The 'layouts' directory defines the overall structure of your pages. 'Layout.astro' likely contains the structure common to multiple pages.
- pages: Your application pages are located here. The main entry point is the index.astro file.
- static: Like the public directory, the static directory is a place where static files are located.
- astro.config.js: The Astro.config.js file is your Astro.js configuration file. You can specify different settings, plugins, and build options according to your project needs.
- package-lock.json and package.json: These are the npm-related files that manage your project’s dependencies. The package.json file contains metadata and dependency information. The package-lock.json file locks specific versions to maintain consistency across different environments.
- readme.md: The README.md file acts as your project's documentation, providing information about your project's scope, installation instructions, and other important information.
A development server with all the necessary tools for project development is pre-installed in Astro. The first time you see your new website in action, use the Astro dev command to launch the local development server.
A pre-configured script to execute Astro dev is included with every beginning template. Run this command to launch the Astro development server using your preferred package manager.
npm run dev

Astro ought to be serving your app at http://localhost:4321/ right now if all goes as planned!
Conclusion
Bravo🎉 On your computer, Astro CLI has been successfully installed. You may create sleek, functional websites quickly and easily with the aid of this strong tool. The official Astro website, astro.build, has comprehensive documentation and further information.