
What is Gatsby.js and How to Install It? A beginner's step by step guide
In today’s ever-changing web development landscape, there is one framework that stands out as the most powerful and modern one that allows developers to build fast websites and apps. With the help of the latest technologies such as React.js, GraphQL, etc., Gatsby has become the go-to framework for creating high-performance static sites that have dynamic capabilities. Gatsby follows the architecture of JAMstack and decouples the frontend from the backend, which leads to faster loading times and a smooth user experience.
Prerequisites
Before we get started with the installation, let’s make sure you have all the necessary tools installed on your computer.
- Node.js (v18 or newer)
- Git
- Gatsby command line interface (CLI) (v5 or newer)
- Visual Studio Code
node.js (v18 or newer): Make sure you have the most up-to-date version of node.js so you can take advantage of all the new features and performance improvements. Node.js is the runtime environment used to execute JavaScript on a server side. It is an essential part of Gatsby’s development.
Git: Git is one of the most important distributed version control systems [VCS] for collaboration and version control. While working on your Gatsby project, you can easily manage your code base with Git installed. If you have not installed Git, go to the official website and follow the installation instructions for your OS.
Gatsby command line interface (CLI) (v5 or newer): The Gatsby command line interface (CLI) is your go-to tool for creating projects, launching development servers, and many other important commands. Keep your Gatsby CLI up to date to get the latest features and enhancements. You can update Gatsby CLI with the following command:
npm install -g gatsby-cli
Visual Studio Code: Visual Studio Code (VS Code) is a free, open-source, and open-source source code editor. It is one of the most popular source code editors used by developers. It has a wide range of features, plugins, and a built-in terminal, making it an ideal tool for developing Gatsby files. If you’re not already using VSCode, you can get it by downloading it from its official website and following the installation steps.
Once you’ve installed VSCode add-ons, you’ll want to make sure that your code follows a consistent style of coding. For example, you can use ESLint in VSCode to catch potential errors, or you can use Prettier to automatically format your code so that you don’t have to worry about any formatting issues.
If you’re already using Gatsby, consider adding VSCode plugins to improve your development experience. For example, add-ons for Gatsby include:
- EsLint: Integrates ESLint into VSCode to help you maintain a consistent code style.
- EsLint.js: Integrates EsLint with VSCode to make Gatsby easier to use.
- IntelliSense for Gatsby: Provides IntelliSense support for Gatsby queries and integration of Gatsby’s commands.
- GraphQL: Enhance your experience with GraphQL in VSCode by adding syntax highlighting, auto-completion, and error checking.
Folder Structure
One of the biggest benefits of Gatsby is that it has a well-structured folder structure. A well-structured project organizes itself in a way that supports scalability, maintenance, and separation of concerns. Let’s take a look at the key folders and files that make up the Gatsby project structure
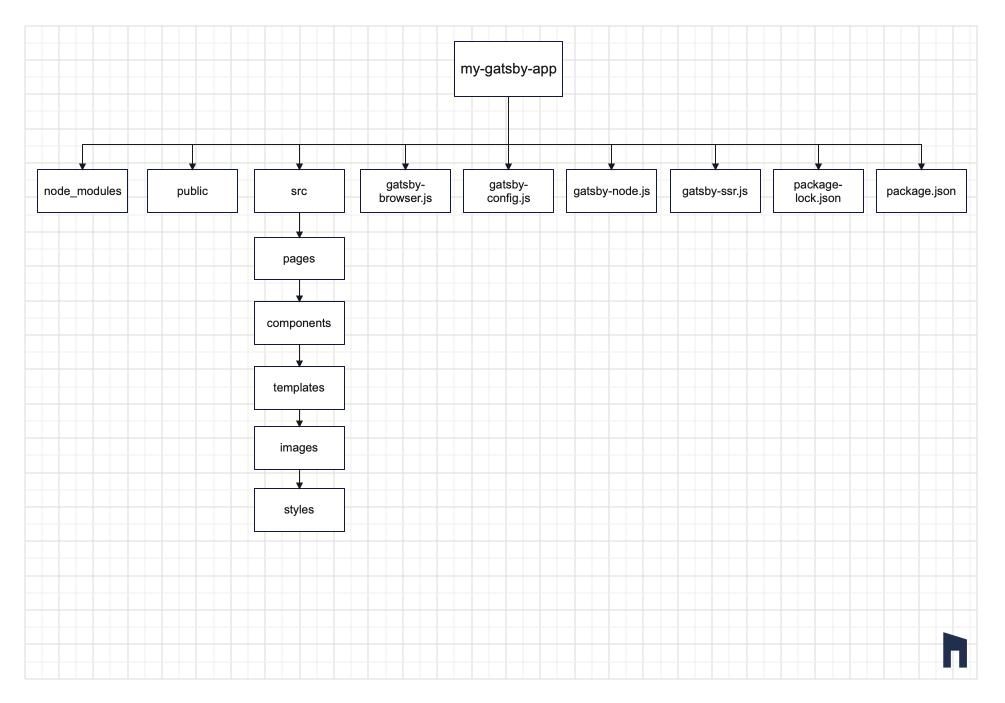
node_modules: This folder contains your Gatsby dependencies. You don’t usually need to access this folder directly.
public: It’s the output folder. This is where Gatsby creates the final static assets such as HTML, CSS, JS, images, etc. After building the site, this is the folder that is deployed to your website or hosting.
This is where your source code for your Gatsby is stored. Here is a list of its sub-folders:
src:
- pages: Each JavaScript file in the src/pages/ folder automatically turns into a page on your site. For instance, index.js turns into the home page (/), while about.js turns into /about.
- components: This is where reusable React assets are stored. You can further organize them by subfolding them based on their use cases.
- templates: Gatsby relies on templates to create data-driven pages. Typically, templates are used for pages with the same structure but different content.
- images: This is where you save your image assets. Gatsby optimizes them and integrates them into the build.
- styles: Where you can save your stylesheet or use your preferred CSS, SCSS, or styled-components.
gatsby-config.js: This file contains the Gatsby configuration options. Here you can add plugins, add site metadata, and add other settings.
gatsby-node.js: This file allows you to change the way Gatsby builds. You can build dynamic pages, change data, and do other things during the build.
gatsby-browser.js: Use this file to manage Gatsby's browser behavior. For instance, add global styles, or wrap the whole application with a provider.
gatsby-ssr.js: This file has the same purpose as gatsbybrowser.js. It controls the behavior of Gatsby during SSR (Server-side Rendering).
How to get started?
To make project management easier, Gatsby.js has a CLI (Command Line Interface). To install it globally on your computer, run the following command,
npm install -g gatsby-cli
This command installs Gatsby CLI on a global level so that you can use it in any folder on your computer.
Now that you have the Gatsby command line interface (CLI), you can start a Gatsby project from scratch with a pre-built starter template. Just run the following in your project's directory:
gatsby new my-gatsby-site
This command creates a Gatsby site using the default Gatsby template. Replace your selected project name instead of “my-my-site”.
To move to the new project directory, execute the following command:
cd my-gatsby-site
Launch the Gatsby Development Server with the following command:
gatsby develop
This will launch the development server. You can then go to the Gatsby website by opening your browser and navigating to the following address http://localhost:8000
Open the code editor and go through the project files that are in the “src” folder. You can customize the content, styles, and settings according to your project needs. Gatsby’s development server will update the site automatically as you make changes.
Gatsby CLI provides various commands for building, testing, and deploying your site. Some useful commands include:
- gatsby build: builds your site for production
- gatsby serve: serves your site for production build for testing
- gatsby Clean: cleans your site’s cache
Conclusion
Bravo🎉 , you have successfully installed gatsby.js and created your new gatsby app. Now, you can dive into the power of this React-based framework for fast and efficient web development.